

SITCOMTN-026
AuxTel PowerUp sequence#
Abstract
This describes how to power up or power down the AuxTel camera.
Introduction#
The AuxTel CCD has been successfully operated at Cerro Pachon and is taking astronomical spectra and images. This document details the power-up and power-down sequences to make sure the CCD operates. This assumes that you are operating within the LSST-WAP network at Cerro Pachon or in La Serena, although this can be run from outside using VPN.
Getting Started#
The first step is to make sure the CCD power supplies are on and set to the correct voltages. The necessary power supplies are shown in this image. At a minimum, the three CCD power supplies, the back-bias supply, and the auxtel-hcu01 computer all need to be powered on.
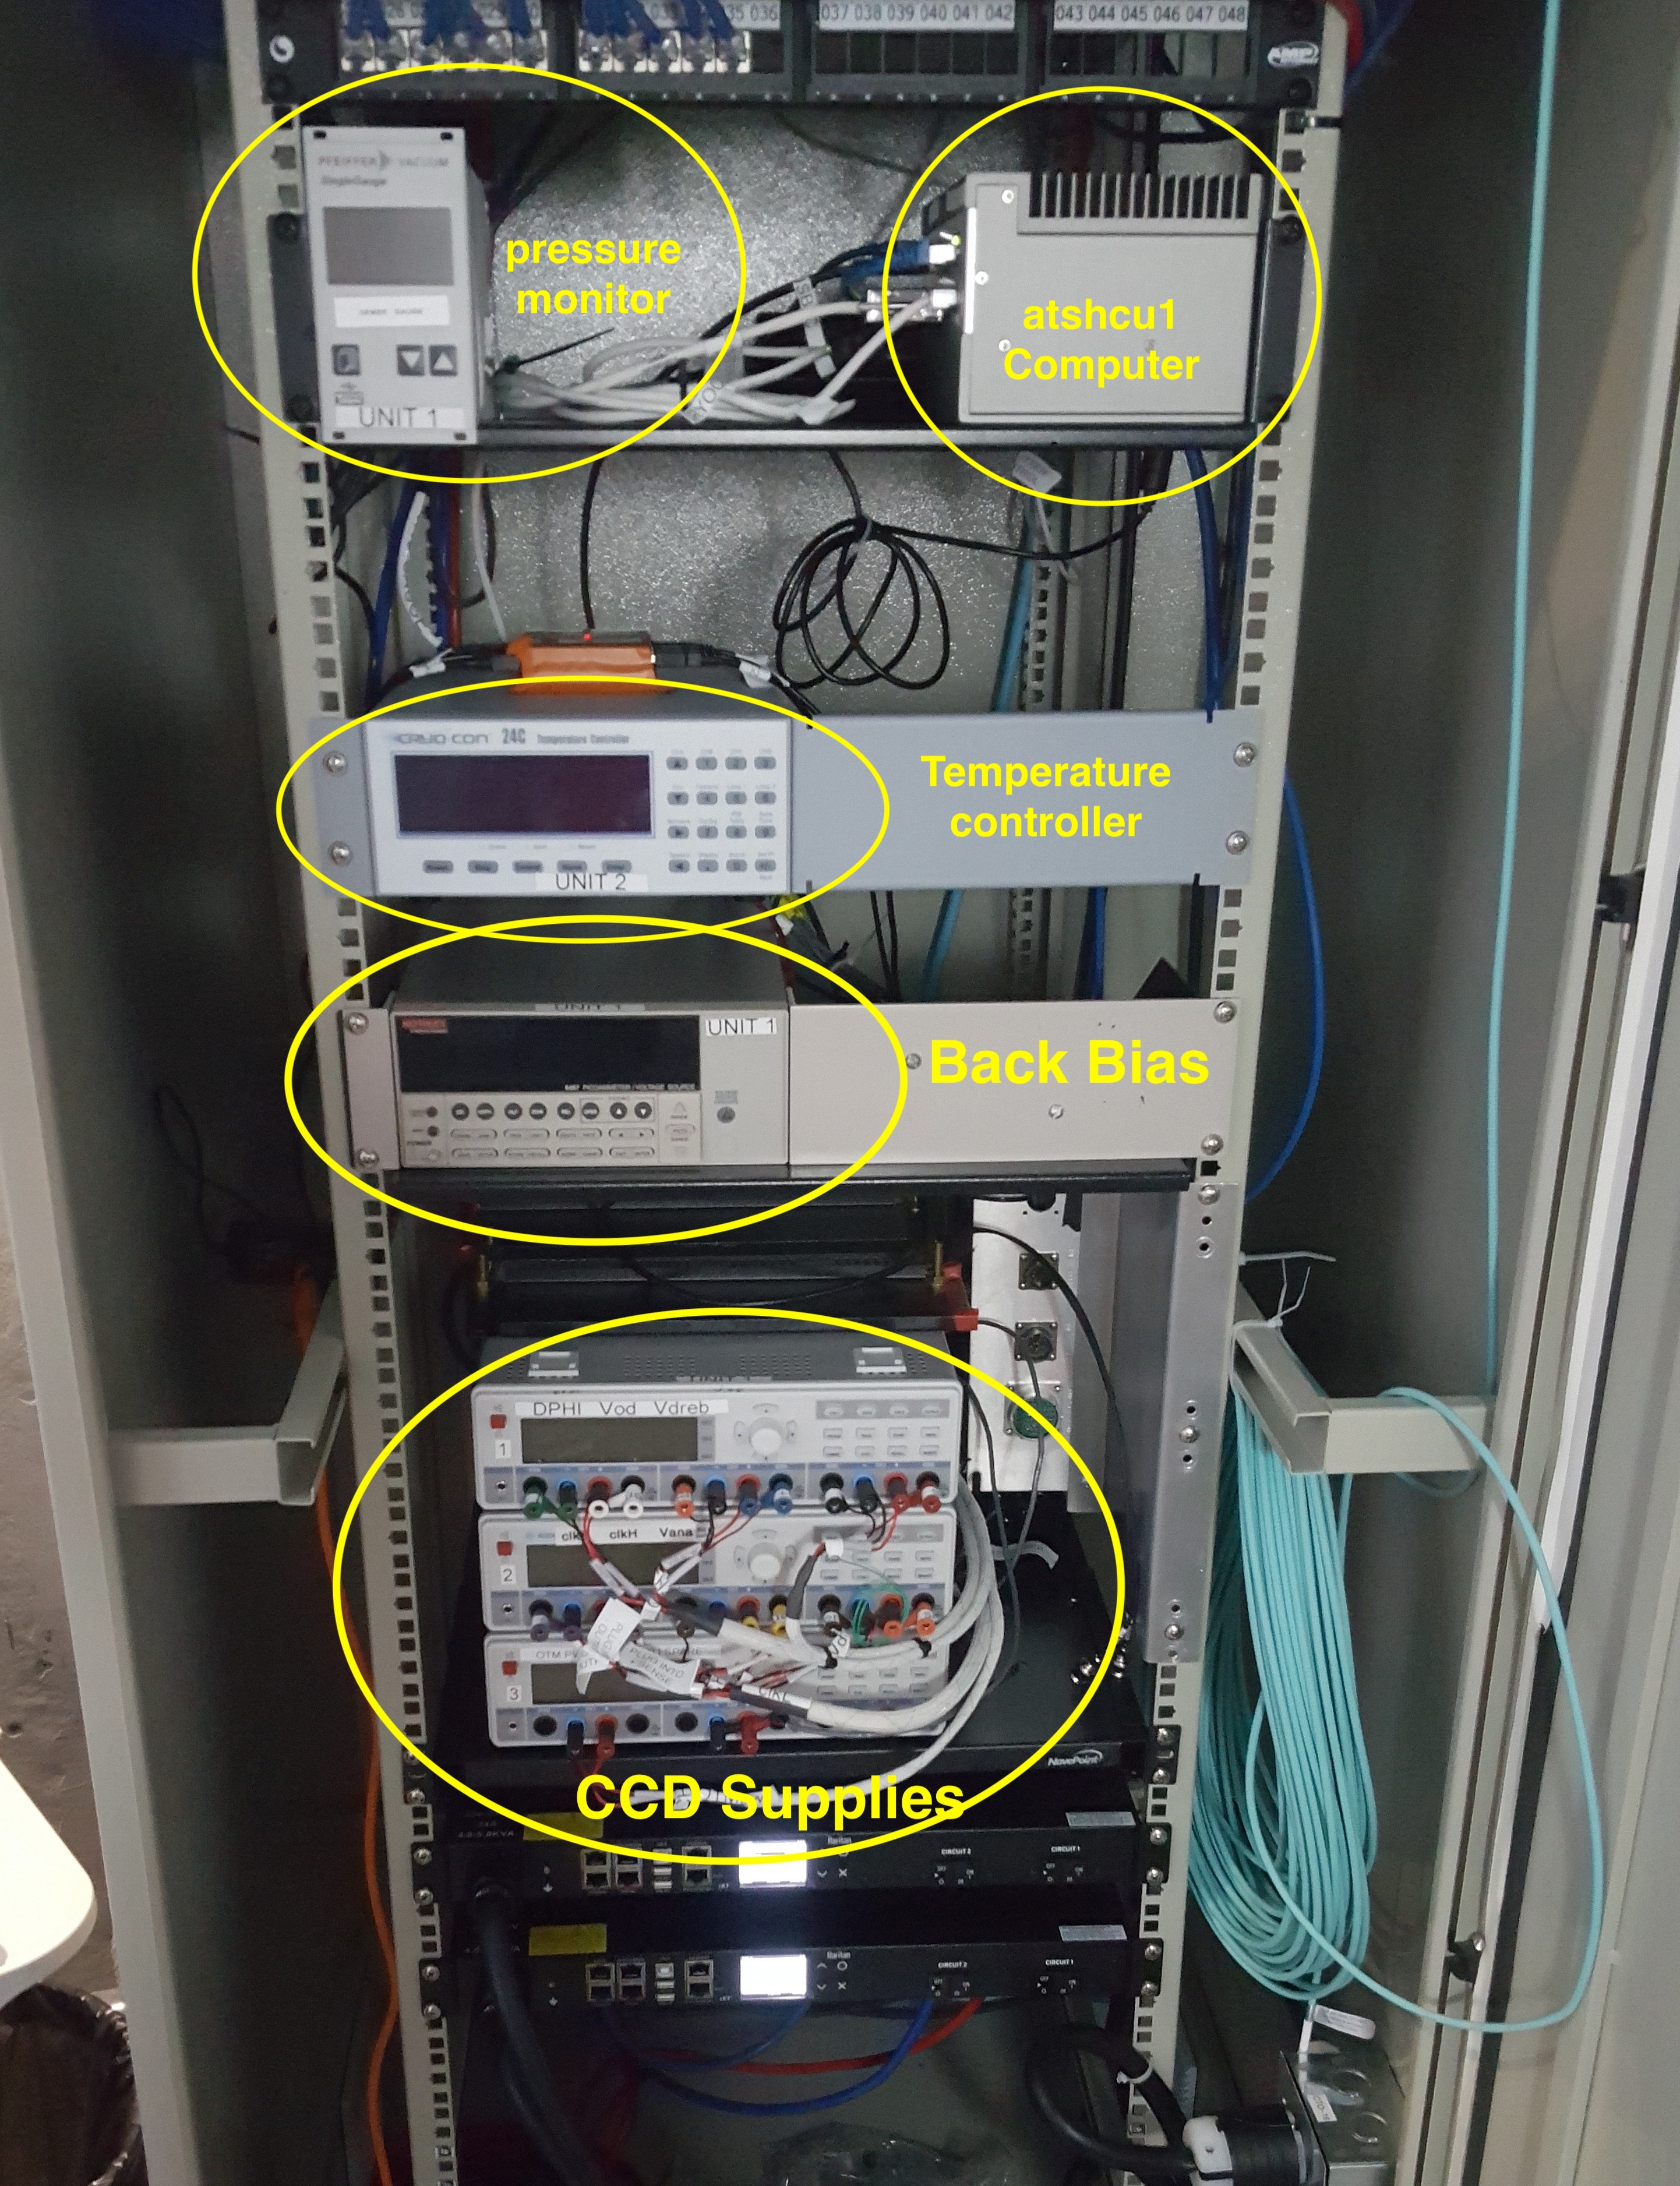
Figure 1. AuxTel power rack
These images show the correct voltages on the three CCD power supplies, each of which provides three voltages. This power is supplied to the WREB board, the OTM board, and the fan. The power is then regulated by the WREB board before being applied to the CCD.
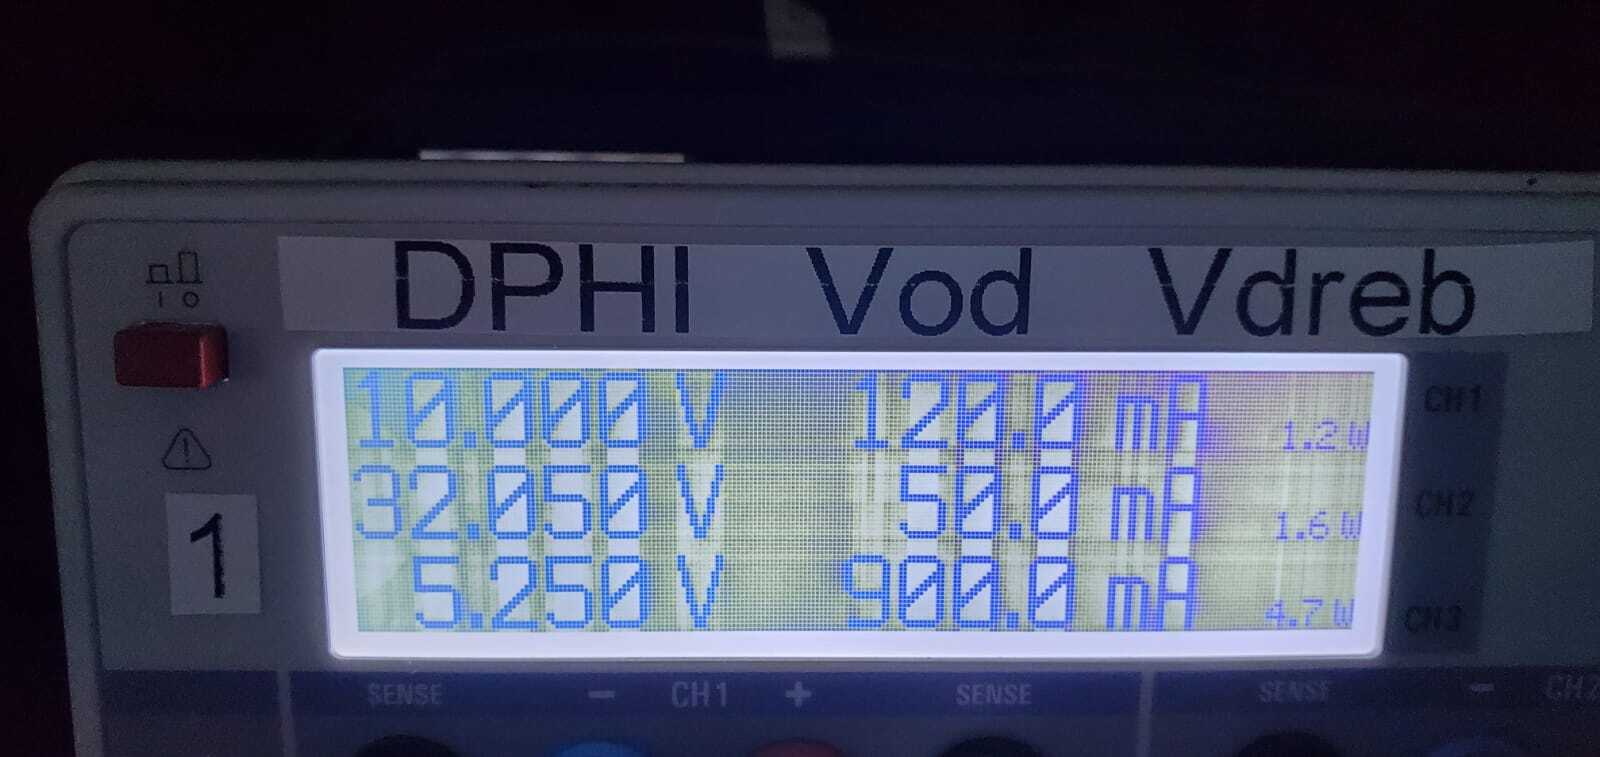
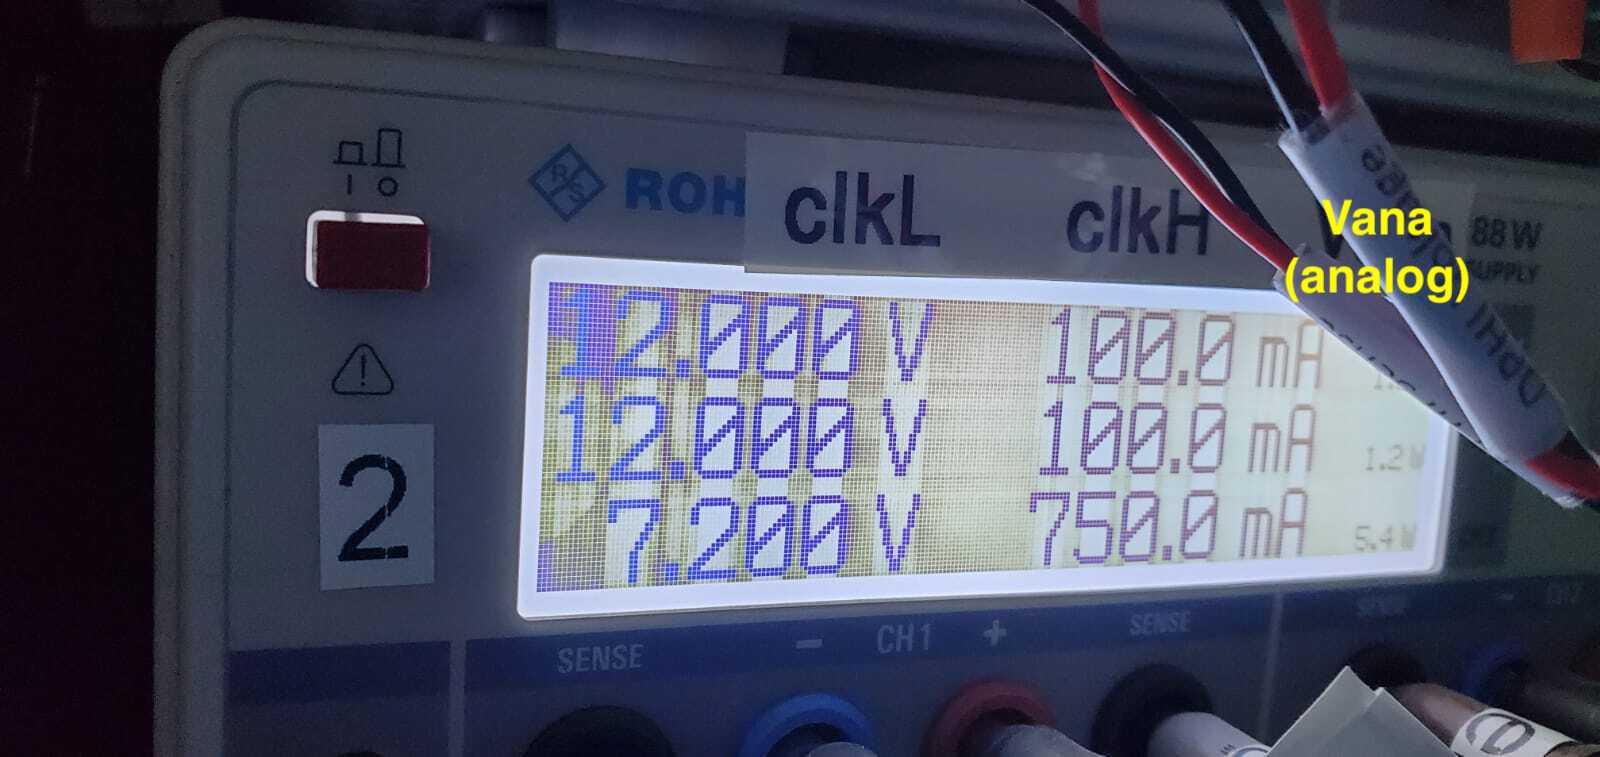
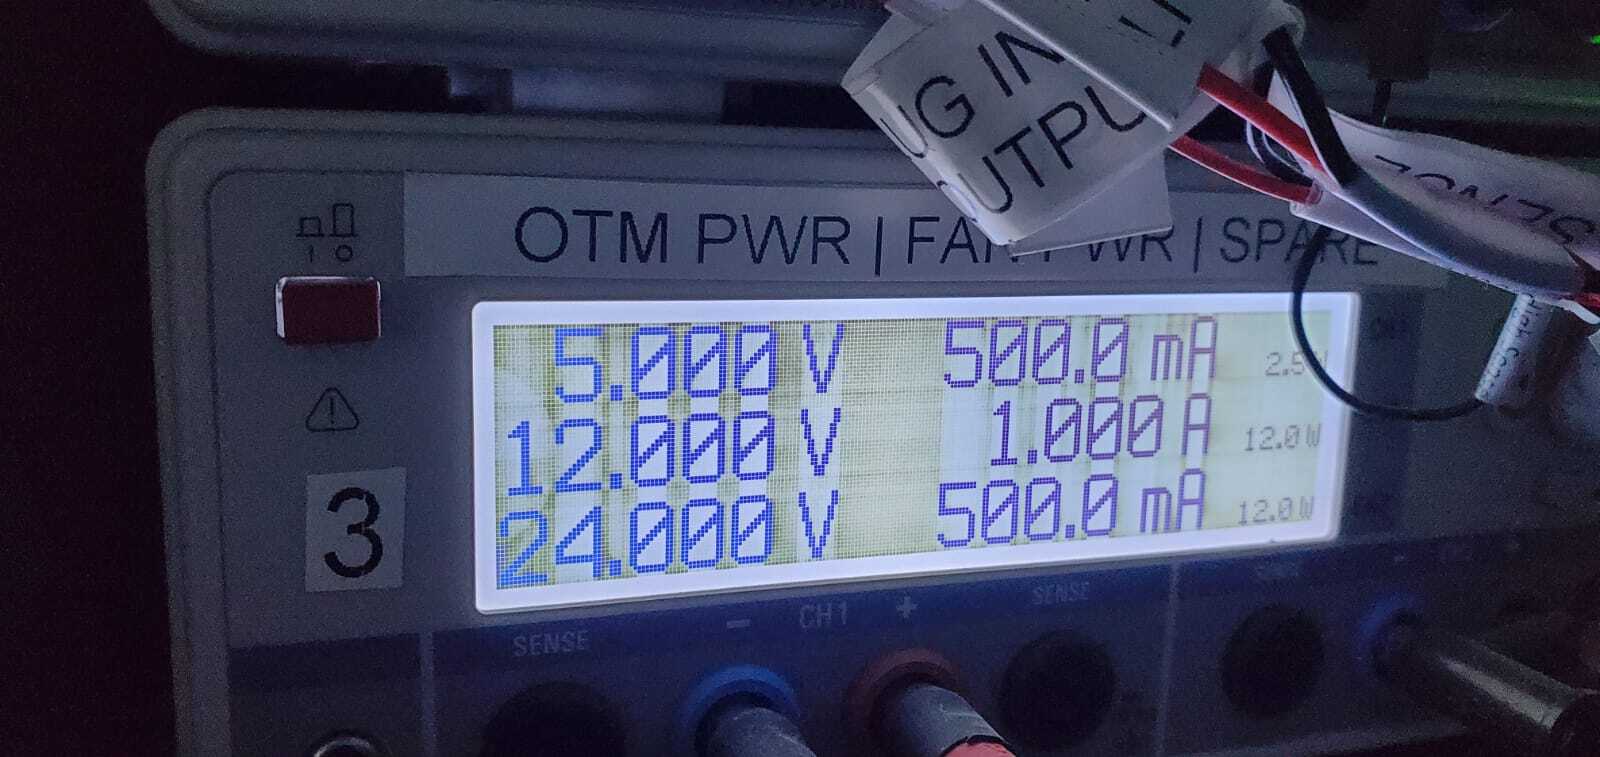
Figure 2. CCD Power Supplies
Once you have verified that these are powered up and have the correct voltages, you can proceed to the next step.
Setting up the necessary connections#
There are multiple ways to do this, but the procedure I have been using is as follows:
Login to auxtel-mcm, using ssh -X -Y yourIPAaccount@auxtel-mcm.cp.lsst.org
Then launch the ccs-console, using ./ccs-console&
If, like me, you have an M1 Mac, then the ccs-console will launch with a black screen. You can fix this by launching ccs-console with the following options: ccs-console -Dsun.java2d.xrender=false -Dsun.java2d.pmoffscreen=false&
The ccs-console should then appear in an X-window. You will need to launch the ats-power tab in the CCS Subsystems pull down menu. It should then look like Figure 3.
At this point, you can view the voltages, but not make changes. To enable changes, you need to set ats-power to a higher level. Do this by following the menu tree as follows - CCS Subsystems - ats-power - Command and Lock Browser. Then set the lock level (10 for example) in the Lock: field. This will lock ats-power and you will need to unlock it later. You will need to have sufficient CCS privileges to do this.
Then launch the ccs-shell, using ccs-shell.
We need to run engineering level commands, so you need to run the following two commands:
ccs>set level ats-fp 10
ccs>ats-fp switchToEngineeringMode
At this point you are ready to proceed to the following sections.
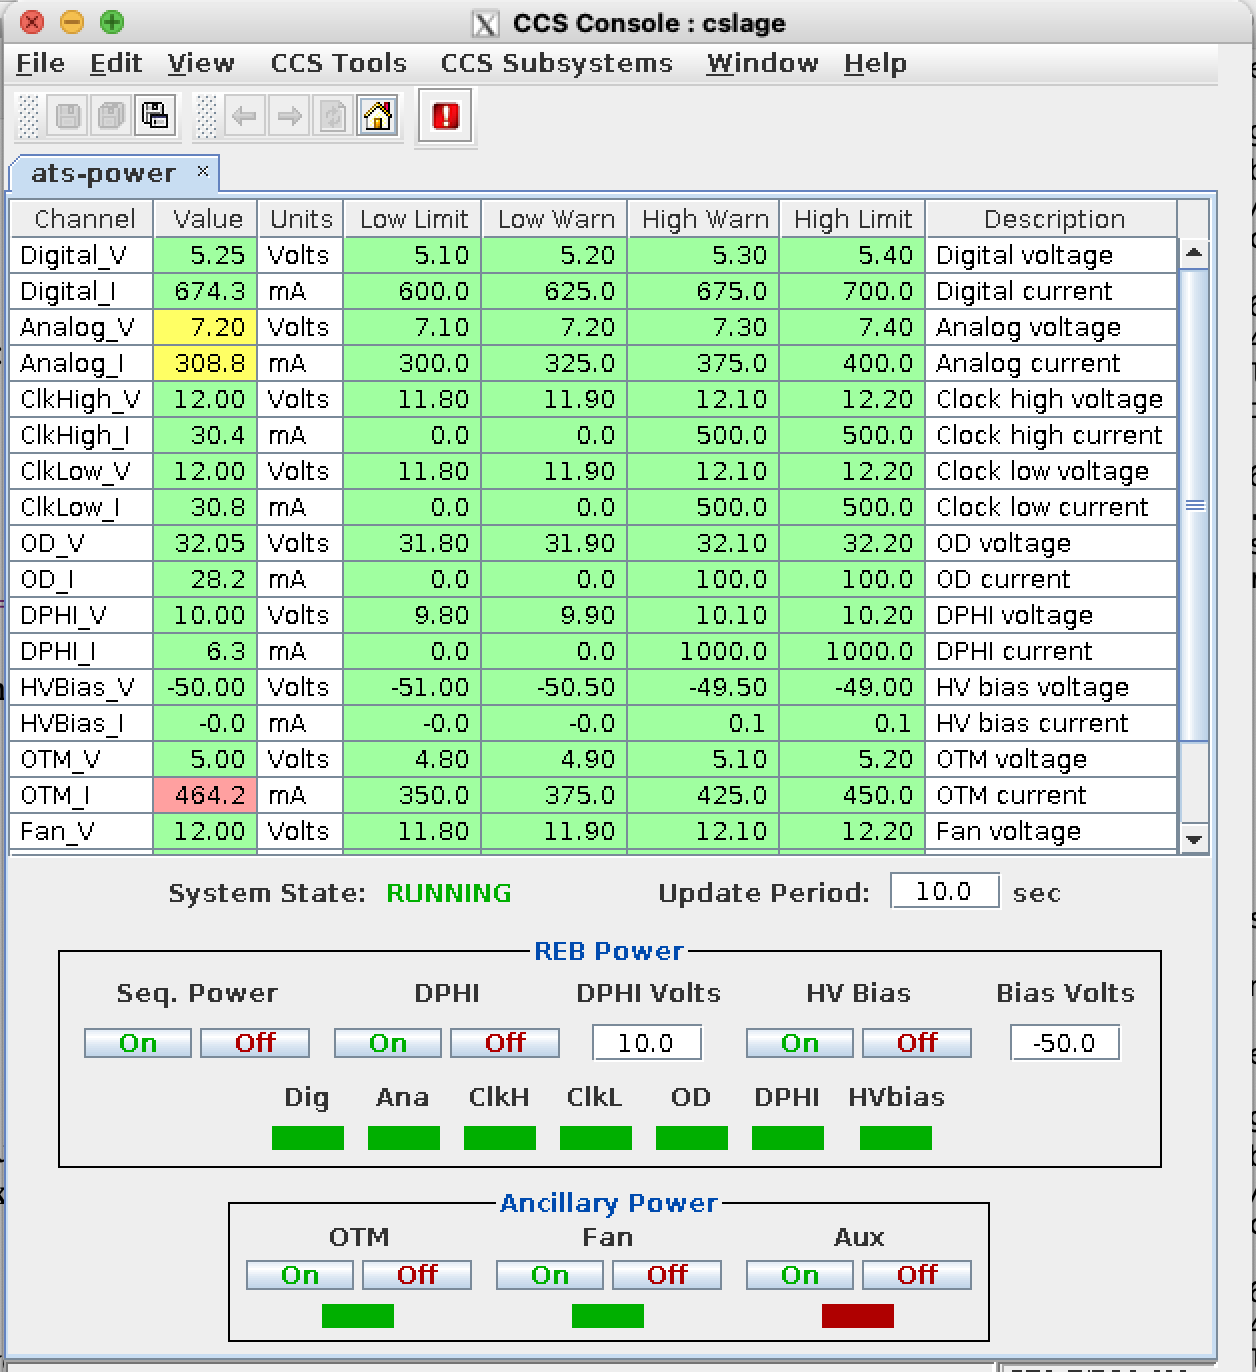
Figure 3. ccs-console screen with ats-power module.
Powering up from a completely cold state#
Assuming you are powering up the CCD from a completely cold state where all power is off, run the commands below. To run these commands, you will need to lock the ats-power subsystem within the CCS console, as described above. Now turn on the following supplies:
In the ccs-console ats-power tab:
Turn Fan on
Turn OTM on
Turn Seq. Power on
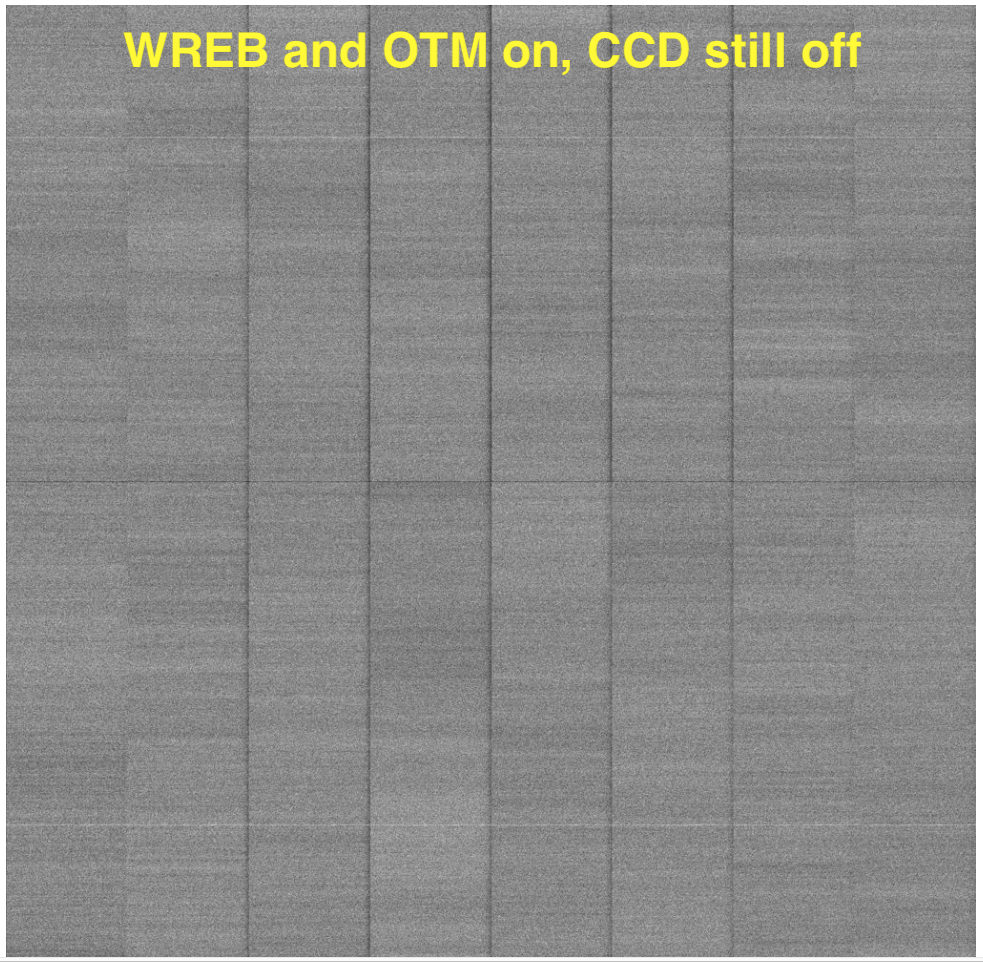
It is possible to take an image at this point, even though the CCD is not powered up yet. What this image should look like is shown in the next section. We complete the CCD power-up as follows:
In the ccs-shell, run:
ccs>unlock ats-fp
ccs>unlock ats-power
Now you need to login into auxtel-hcu01 to run the atsInit.py script:
ssh -X -Y yourIPAaccount@auxtel-hcu01.cp.lsst.org
To run the init script, you need to be user ccs. This requires sudo privileges. Then run:
$ sudo su ccs
$ cd /home/ccs/scripts/
$ ./atsInit.py
This command should run, and the CCD should power up successfully. This script does a number of checks before running the ccs>ats-fp powerCCDsOn command. The script itself is included in the “documents” directory associated with this technote.
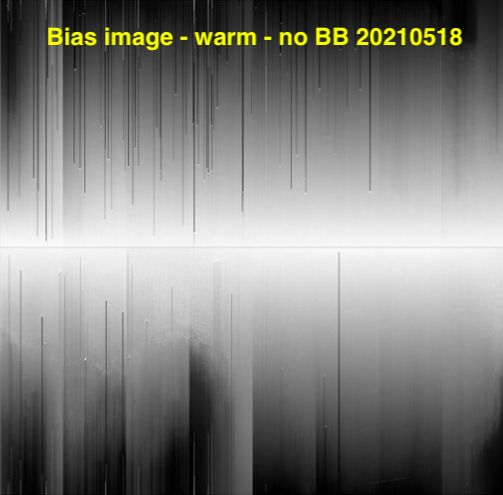
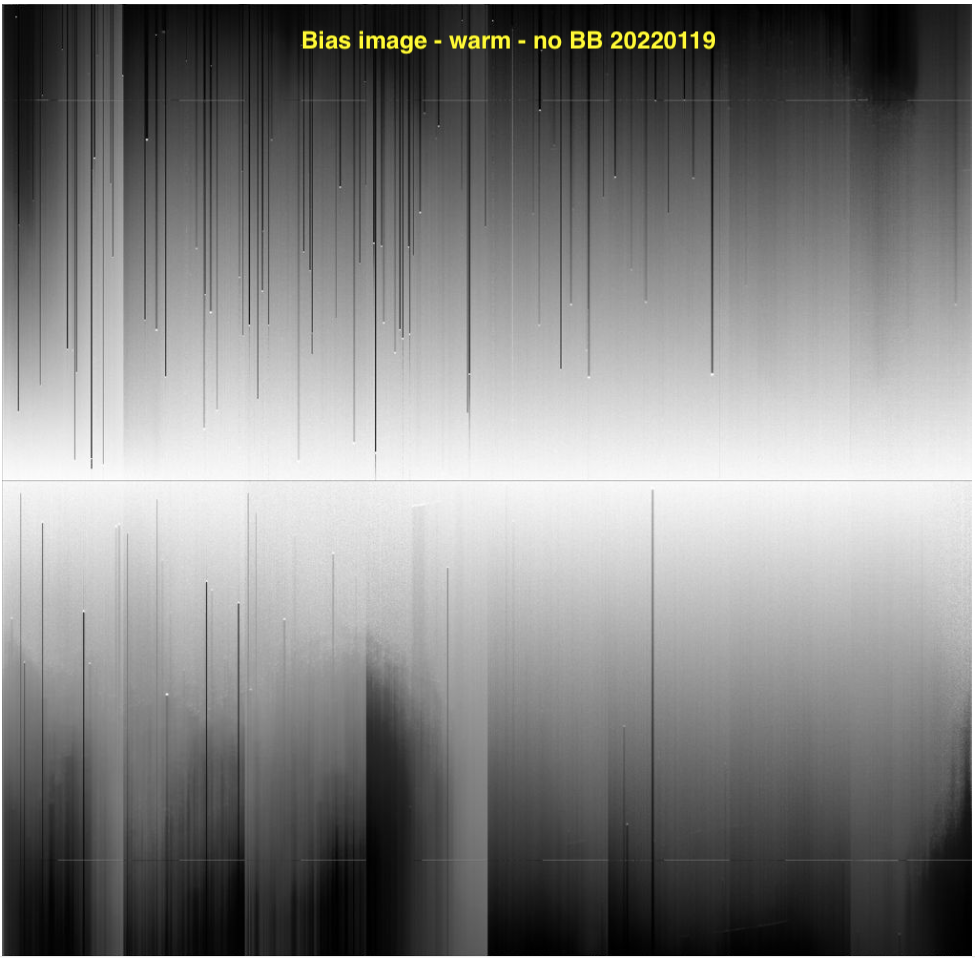
It is suggested to take some images at this point to make sure everything is connected, before turning on the HV bias. Representative images are in the next section.
Once you are satisfied with the images, you can turn on the HV bias. This should not be done unless the CCD is cold. To turn on the HV bias, run the following steps:
In the ccs-console ats-power tab, turn HV Bias On. You will need to re-apply your lock. This applies the HV bias to the WREB board, but not yet to the CCD.
In ccs-shell run: ccs>ats-fp/R00/RebW setBackBias true . This applies the back bias to the CCD. You will again need to apply your lock and be in engineering mode to run this.
Note that both of these steps must be performed to turn on the HV bias. The CCD should now be powered up and ready to run.
Representative images during power up.#
If you take an image before running atsInit.py, the CCD is not really on and connected, so you are just reading out noise. However, this is useful to verify that images are being taken and stored. An image at this point should look somthing like this:
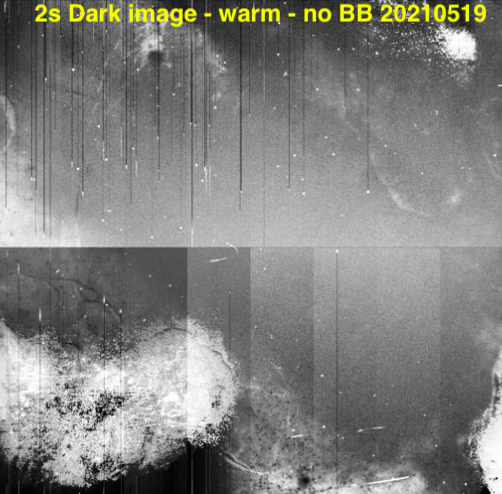
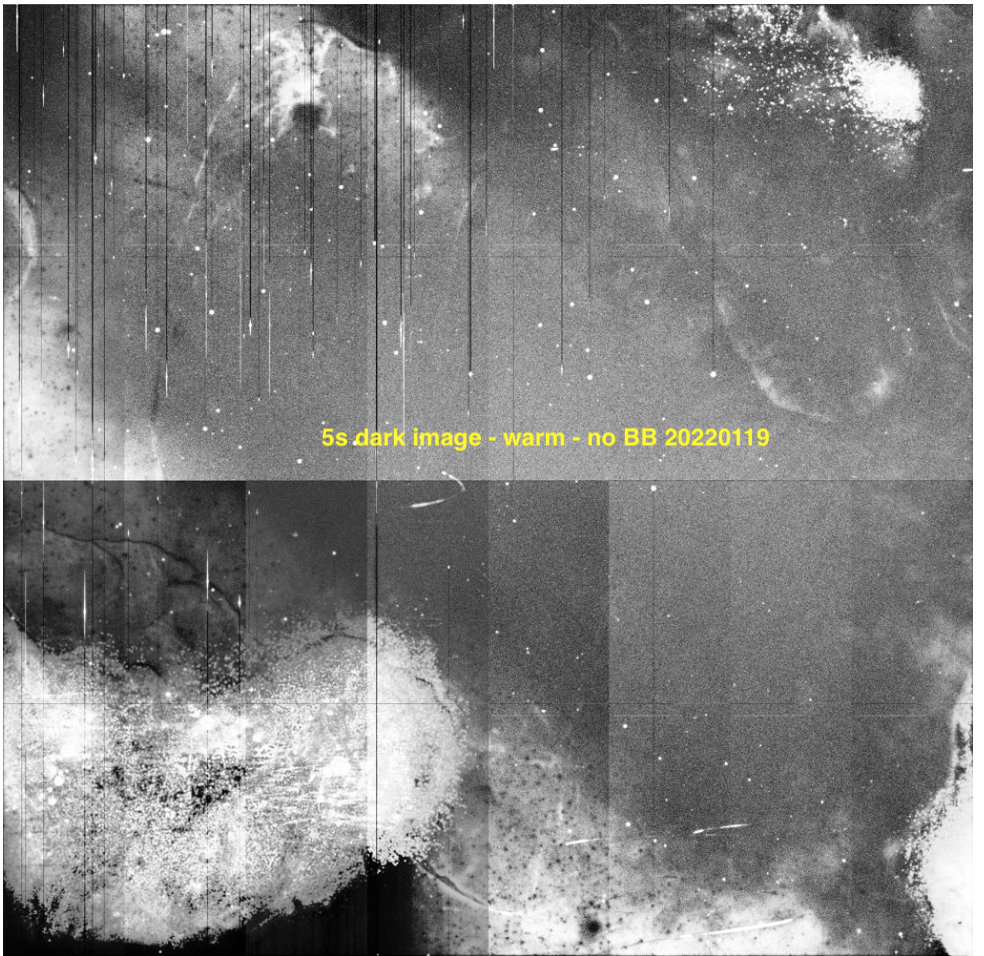
Images taken while the CCD is warm and without back-bias can look quite ugly. Here are some representative images to compare with:
Powering up the CCD when Seq Power is already on#
If the Seq Power is already on, then we know the WREB is still in the state where the parallel clocks are enabled. In this case, all that is required to power up the CCD is the following:
Run the atsInit.py script as described above
This command should run, and the CCD should power up successfully.
In the ccs-console ats-power tab, turn HV Bias On.
In ccs-shell run: ccs>ats-fp/R00/RebW setBackBias true
Note that both of these steps must be performed to turn on the HV bias. The CCD should now be powered up and ready to run.
Powering down the CCD, leaving Seq Power on#
To power down the CCD, leaving the WREB Seq Power on, do the following steps. This should be the normal sequence for powering down the CCD:
In ccs-shell run: ats-fp/R00/RebW setBackBias false
In the ccs-console ats-power tab, turn HV Bias Off.
In ccs-shell run: ats-fp/R00/RebW powerCCDsOff
The CCD is now powered down, but the WREB is still powered up.
Powering down completely#
If, for some reason, you want to completely power down the entire camera, do the following steps after completing the above section. Note that if you then want to power up after this, you need to follow the “Powering up from a completely cold state” section above.
In the ccs-console ats-power tab, turn Seq Power off
In the ccs-console ats-power tab, turn OTM Off.
In the ccs-console ats-power tab, turn Fan off.
The system should now be completely off.
Removing the locks#
When you are done with whatever you are doing, you need to remove the locks. For example, you cannot enable ATCamera (steps below) unless the locks have been removed. To remove the locks, run the following commands in the ccs-shell:
ccs>ats-fp switchToNormalMode
ccs> unlock ats-fp
ccs> unlock ats-power
Bringing ats-ocs-bridge to the proper state.#
One of the CCS modules is ats-ocs-bridge. This is the subsystem that interfaces between CCS and the Observatory Control System (i.e. the CSCs). In this case ats-ocs-bridge is interfacing with the ATCamera CSC. It is necessary to get ats-ocs-bridge into the proper state in order to be able to control ATCamera with LOVE and the script queue, for example to take images with the script queue. Here are the necessary steps:
- Run the following ccs-shell command: >ats-ocs-bridge getState. This will return something like::
AlertState:NOMINAL CCSCommandState:IDLE CommandState:READY ConfigurationState:CONFIGURED OfflineState:OFFLINE_PUBLISH_ONLY OperationalState:ENGINEERING_OK PhaseState:OPERATIONAL SummaryState:OFFLINE
The SummaryState is the same state of ATCamera you see with LOVE. If the SummaryState is FAULT, it cannot be brought out of fault with the normal LOVE commands. It needs to be brought out of fault with the ccs-shell command >ats-ocs-bridge clearFault command.
Assuming the SummaryState is OFFLINE, then we look at the OfflineState. If the OfflineState is:OFFLINE_PUBLISH_ONLY, we need to transition it to OFFLINE_AVAILABLE before we can use the usual state transition commands in LOVE and the script queue to bring it online. This is done with the ccs-shell command >ats-ocs-bridge setAvailable.
Once we have it in SummaryState OFFLINE and OfflineState OFFLINE_AVAILABLE, we can then transition it using the script queue and the set_summary_state.py to bring the SummaryState to STANDBY. I am assuming you know how to do this.
Once the SummaryState is STANDBY, you can run the ‘start’ and ‘enable’ commands in LOVE to bring up ATCamera. Or you can run enable_latiss.py in the script queue to bring up all of LATISS. If this is successful, things should now be operating normally.
Note that if you have brought ATCamera to ENABLE in order to take images before turning on the HV bias, you will need to put ATCamera back into STANDBY to run the necessary ccs-shell commands to turn on the HV bias.